4.3 Installing the AD FS Adapter Mobile
Before you install the AD FS Adapter Mobile, install the MyID Verification Service on the MyID web server; see section 3.1, Installing the verification service.
Make sure you have carried out the prerequisites for the AD FS Adapter before you run the installation program; see section 4.2, AD FS Adapter Mobile prerequisites for details.
You must install the AD FS Adapter Mobile on the AD FS server.
To install the adapter:
-
Copy the installation program onto the AD FS server.
The AD FS Adapter installation program is provided with the MyID installation media in the following folder:
\Authentication\AD FS Adapter for MyID\
- Run the .msi installation program.
-
Click Next to begin.
-
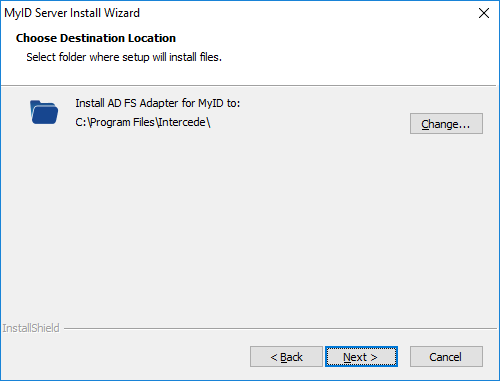
Select the location for the AD FS Adapter.
By default, the AD FS Adapter is installed to the following location:
C:\Program Files\Intercede\
The installation program creates a the following folders in this location:
-
ADFS_Adapter_Mobile – contains the AD FS Adapter configuration files.
-
Themes – contains the themes for the AD FS Adapter.
Note: The themes folder is shared with the AD FS Adapter OAuth, if you have it installed.
Click Next, and the Select Features screen appears.

-
-
Select the ADFS Adapter Mobile option.
For details of using the ADFS Adapter OAuth for FIDO devices, see the Installing the AD FS Adapter OAuth section in the MyID Authentication Guide.
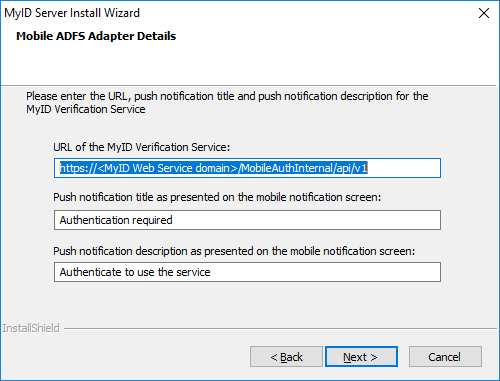
Click Next, and the Mobile ADFS Adapter Details screen appears.
-
Provide details of the MyID Verification Service:
-
URL of the MyID Verification Service – the URL of the MyID Verification Service internal web service. The default is:
https://<MyID Web Service domain>/MobileAuthInternal/api/v1
Replace <MyID Web Service domain> with the name of your own MyID web server; for example:
https://myserver.example.com/MobileAuthInternal/api/v1
- Push notification title as presented on the mobile notification screen – the title of the notification that appears to the user on the mobile device when authentication is required.
- Push notification description as presented on the mobile notification screen – the text displayed in the notification that appears to the user on the mobile device when authentication is required.
See section 4.3.2, Notification display text for information on how the push notification text is used on the MyID Authenticator app.
Click Next, and the Mutual TLS Certificate Details screen appears.
-
-
Provide details of the mutual TLS certificate:
-
Store Location – the location of the store where the mutual TLS certificate is located.
The default is LocalMachine.
- Store Name – the name of the store where the mutual TLS certificate is located. The default is Personal.
- mTLS Thumbprint – the thumbprint of the mutual TLS certificate.
For more information, including how to obtain the thumbprint of the certificate, see section 4.2.1, Mutual TLS.
Click Next, and the MyID Theme screen appears.
-
-
Type the display name that was provided for the Relying Party Trust for which the AD FS Adapter Mobile will provide the authentication.
To find the display name, look in the following location:
Server Manager > Tools > AD FS Management > AD FS > Relying Party Trusts > Display Name
For more information on themes, see section 4.4, Managing the AD FS Adapter Mobile.
Click Next, then click Install.
- When the installation program has completed, click Finish.
4.3.1 Uninstalling the AD FS Adapter Mobile
You can uninstall the AD FS Adapter Mobile from the Apps & features section of Windows Settings; it is listed as the AD FS Adapter for MyID.
Note: Uninstalling the AD FS Adapter Mobile also uninstalls the AD FS Adapter OAuth, if you have it installed.
4.3.2 Notification display text
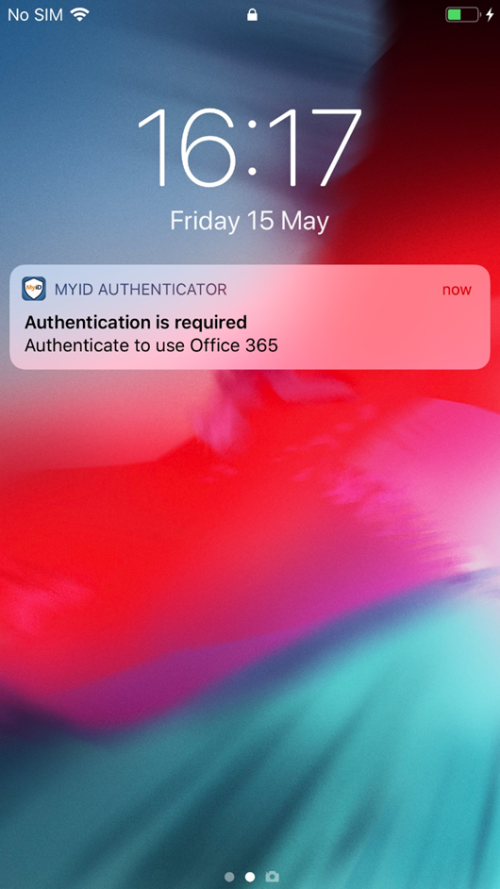
The AD FS Adapter installation program allows you to specify the title and description for the notification that appears to the user on the mobile device when authentication is required.
For example, if you set the title to "Authentication is required" and the description to "Authenticate to use Office 365", the notification would appear on an iPhone as follows:


